Showing posts with label How to Eat Supper. Show all posts

Sunday, January 18, 2009

Weeknight Curry, etc.

As mentioned in my previous blog, Mark and I resolved to each cook through a cookbook this year. I didn't choose the most ambitious of books, but it's full of helpful techniques that will enable me to bring more improv into our kitchen.

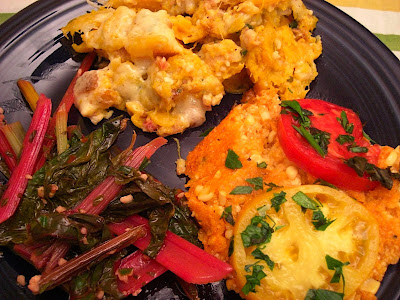
Sweet Yams in Ginger-Stick Curry from How To Eat Supper

Yams
4 quarts salted water
2 large Garnet or Jewel yams (about 1 3/4 pounds), peeled, halved lengthwise, and cut into 1/4-inch-thick half-rounds.

Curry
Extra Virgin Olive Oil
One 1 inch piece fresh ginger, peeled and sliced into paper-thin matchsticks (Rachel Ray told me a long time ago...buy a big hunk of ginger, bring it home, peel it, cut it into chunks, and put it in a ziplock in the freezer. Otherwise, it dries out and doesn't last very long. It even slices better in its semi-frozen state)
4 large garlic cloves, sliced paper thin
1 jalepeño, sliced very thin
2 whole scallions, cut into 1-inch lengths
2 large shallots, sliced thin
Salt and Pepper
1/2 light-packed cup fresh basil leaves, course chopped (I was craving Thai basil, searched high and low for it, but even the huge World Market beside our house was out...regular basil was okay)
Juice of 1 lime
(I added a package of fresh snow peas to this mix)

1. Bring water to boil.
2. Once water is bubbling fiercely, drop in the yams and cook them at a hard bubble for 10 minutes, or until tender. Drain in a colander and turn into a serving dish. Set the pot back on the stove.
3. Generously film the pot with oil. Set it over medium-high heat and add the snow peas, ginger, garlic, jalepeño, scallions, shallots, and generous sprinklings of salt and pepper (I used the mandoline for all the veg). Saute for two minutes, stirring often. Then cover the pot tightly, reduce the heat to medium low, and cook for 5-8 minutes, or until the ginger has softened.

Do take note, Lynne says:
Cutting the ginger into paper-thin matchsticks may seem fussy, but there is method to what seems to be madness. That shape changes how you taste the ginger in this dish. Crushed or chopped ginger would taste different - an interesting thing to remember when you see very specific instructions like these in Chinese recipes. There's always a reason.
4. Stir in the basil and cook, uncovered, for no more than 30 seconds. Spoon curry over yams, and squeeze lime juice over the finished dish.

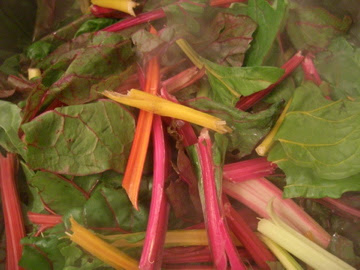
We served this atop Mark's project, Veganomicon's Easy Stir-Fried Leafy Greens


Mark:
I started with the simplest recipe I could find, not because I wanted it to be simple, but because I wanted to make greens. I love greens! The book I chose was Veganomicon, from which we had made a few recipes already that all turned out well (please see Acorn Squash Empanadas with Chilantro "Sour Cream" and Chick Pea cutlets from previous posts).

The recipe is simple - 1 pound of greens, garlic and ginger, stir-fried, with some asian sauces. I used mirin and shoyu (in place of soy sauce. These are some of the great things we picked up during Wendy's readings of macrobiotic literature), and sesame oil. I thought it was going pretty well, but I decided to use the two pounds of collard greens we already had and doulbed the recipe. When the recipe had run its course it turns out the greens kind of sucked, not because of the recipe, but because collard greens are naturally bitter and much better at stewing in a pot with some form of pork belly for 2 hours.

So what could possibly dominate these failed greens into tasty submission?

Wendy interceded with a heavy hand, adding about a tablespoon of lemon juice and many many many squirts of Tabasco's smokey chipotle flavor - greens saved!

Wendy here...the greens didn't really suck, they were just blander than we're used to. I'm convinced that I've burned off most of my taste buds, so that's why I have to cover everything in sauces!

On another night this week, we made this quick, simple soup from Everyday Food

Soba Soup with Spinach
  • 2 tablespoons vegetable oil
  • 12 ounces shiitake mushrooms (stems removed), caps thinly sliced
  • 4 scallions, white and green parts separated and thinly sliced
  • 1 garlic clove, minced
  • 1 tablespoon peeled and minced fresh ginger
  • Coarse salt
  • 2 cans (14.5 ounces each) reduced-sodium chicken broth (I used a carton of veg broth, but use what you have)
  • 1/2 package (4.4 ounces) soba (Japanese buckwheat noodles)
  • 1 bunch flat-leaf spinach, torn
  • 2 tablespoons fresh lime juice
  • 1 tablespoon soy sauce (again, we don't keep soy sauce, so I did a mix of mirin and shoyu)
  1. In a large saucepan, heat oil over medium. Add mushrooms, scallion whites, garlic, and ginger; season with salt. Cook, stirring occasionally, until mushrooms are tender, 6 minutes.
  2. Add broth and 3 cups water; bring to a boil. Add soba; reduce to a simmer, and cook 5 minutes. Add spinach; cook just until tender, about 1 minute. Add lime juice and soy sauce. Serve topped with scallion greens.
It was a light, super quick, lovely meal. I, of course, added chili paste to my bowl. I can't help myself.

Saturday, November 22, 2008

South of France Tomato Soup with Young Chèvre


To tell you the truth, I wasn't a fan, but Mark loved it. The combination of the cinnamon with the salty, pungent goat cheese was pretty magical, but it was just too much for me. I know, I'm a baby. This was, however, the most interesting tomato soup I've ever had. Try it for yourself. Here's the recipe:

Generous ½ teaspoon dried basil
Generous ½ teaspoon fennel seeds
Generous ½ teaspoon dried oregano
Generous ½ teaspoon dried thyme
Good-tasting extra-virgin olive oil
3 medium onions, finely chopped
Salt and fresh ground black pepper
3 large cloves garlic, minced
Generous ¼ cup tomato paste
1/3 cup dry vermouth
2 pounds good-tasting fresh tomatoes (do not use Romas), peeled, seeded and chopped; or one can (28 ounces) whole tomatoes with their liquid, crushed (I used canned fire-roasted because that's all I had)
2 cans (14 ounces each) chicken or vegetable broth and 2/3 cup water
Generous ¼ teaspoon ground cinnamon, or to taste
Salt and fresh ground black pepper to taste
4 ounces fresh goat cheese, crumbled

1. Combine dried herbs in a small cup. Crush them lightly until they become fragrant. Set aside.

2. Film the bottom of a 6-quart pot with olive oil. Heat over medium-high heat. Stir in onions, season with salt and pepper, and cook until onions are golden brown, 5 to 8 minutes, stirring often. Add reserved herbs and garlic. Continue cooking until their aromas open up, about 30 seconds.

3. Blend in tomato paste until there are no lumps; then add vermouth and tomatoes. Boil for 2 minutes. Pour in broth, stir, adjust heat to a light bubble, and cover pot tightly. Cook 20 minutes. Then blend in cinnamon, taste and adjust seasonings if needed.

4. Ladle soup into bowls, and top each serving with crumbles of goat cheese.

From, you guessed it, How to Eat Supper

Tuesday, October 14, 2008

Aren't you tired of cheesy pasta?

For a girl who has never known her limits...um, yeah...I kinda am tired of the barrage of pasta dishes. Sorry. Maybe this will be the last horah for a little while.

Saturday night, we tried another recipe out of How to Eat Supper. This time, it was in the name of using up tomatoes (I know, you've heard it all before). The title sounds dramatic:

Cheese-Gilded Linguine with Smokey Tomatoes


What you'll need:
* 5 quarts salted water in a 6-quart pot
* Extra-virgin olive oil
* 6 thick slices bacon, sliced into 1/4-inch-wide sticks (I didn't use thick bacon)
* 1 medium to large onion, chopped into 1/4-inch dice
* Salt and fresh-ground black pepper
* 1/4 teaspoon red pepper flakes, or to taste
* 5 large garlic cloves, minced
* 2-1/2 to 3 pounds delicious ripe tomatoes, cored and fine chopped (do not peel or seed); or one 28-ounce can whole tomatoes with their liquid, plus one 14-ounce can, drained(I used one can whole and one can chopped)
* 1 pound imported linguine (We used Mark's homemade chive pasta)
* 1 generous cup fresh-grated Parmigiano-Reggiano cheese, plus more for the table

What you might do:
1. Make fresh pasta a la Mark Barrett

false start pasta... too sticky to be salvaged and sad about it

2. Boil then generously salt water.

3. Lightly film a straight-sided 12-inch saute pan with oil (I didn't add any oil), add the bacon, and set over medium-high heat. Saute until the bacon is golden. Remove it with a slotted spoon, setting it on paper towels to drain. Pour off all but about 3 tablespoons of the fat from the pan (We only had about 6 tablespoons total, so we transferred three into the next pan over--kale side dish, mentioned below).

4. Return the pan to the heat, and stir in the onions, salt and pepper, and red pepper flakes. Reduce the heat to medium. Sauté until the onions soften and start to color, 5 to 8 minutes.

5. Blend in the garlic, cooking for 1 minute, and then add the tomatoes. If using canned ones, crush them as they go into the pan. Stir in the cooked bacon. Bring the sauce to a lively bubble and cook until it is thick, 7 to 8 minutes, stirring to keep it from sticking. Remove from the heat, taste for seasoning, and cover the pan. The sauce can wait on the stovetop for up to an hour. Bring it to a bubble before adding it to the pasta.

6. Drop the pasta into the boiling water, and cook until it is tender but still a little firm to the bite. Drain, and turn it into a serving bowl. Toss with the 1 cup cheese until it clings to the noodles, then toss with the sauce. Serve hot, with additional cheese at the table if desired.

My process was a bit different as I was multi-tasking like the well-oiled efficient kitchen machine that I am. I sauteed a side dish of extremely well-seasoned and delicious kale (believe me, I was impressed as I haven't had much luck in the past) with baby turnips. Also, at the same time, I prepped a second recipe from the very same book for Carrie's brunch the next day:

21st Century Mac & Cheese

Here's the recipe from the book that serves 4, but we doubled it

  • 1/2 pound (2 cups ) raw penne pasta, cooked and drained (I used organic elbows)
  • 1 large egg
  • 1 cup milk
  • 1 small clove garlic (um, yeah right)
  • 3/4 medium onion, coarsely chopped (2 onions)
  • 1 generous cup (5 ounces) shredded good quality, extra-sharp cheddar cheese ( 1 c. Grafton's cheddar + 1 c. mixed bag of Gruyere, Pecorino Romano, and a bit more cheddar)
  • 5 ounces cream cheese, crumbled (as the recipe was supposed to be "doubled," I didn't remember the measurements while shopping, so I only used 1 8 oz. bar of cream cheese--organic--believe me, I used to be the biggest ol' el cheapo ever, but if you're going to all this trouble anyway, what's 60 cents? I can honestly taste the difference in organic dairy and I could talk for just about forever on the subject, but I won't, maybe later)
  • Generous 1/8 teaspoon each hot red pepper flakes, salt, and freshly ground black pepper
  • Generous 1/4 teaspoon sweet Hungarian paprika (I was careful with the paprika this time)
  • 3 tablespoons unsalted butter (I didn't make a crust because of time constraints)
  • 12 saltines, coarsely crumbled (you don't need saltines if you don't opt for the crust)

1. Preheat oven to 350. Butter a shallow 1 1/2 quart baking dish, and add cooked macaroni.

2. In a blender or food processor combine egg, milk, and garlic, and process 3 seconds. Add onion, cheeses, peppers, salt, and paprika, and blend 10 seconds. Turn into dish, folding into macaroni. Casserole could be covered with plastic wrap and refrigerated up to 24 hours at this point.

3. To bake, bring casserole close to room temperature. As mentioned earlier, I didn't make the crust because I woke up too late, but if you're good and set your alarm, you might: melt butter in a small saucepan. Coat crackers with butter and spread over top of casserole. Bake about 20 to 25 minutes, or until thick yet creamy. If top is not golden, slip under broiler for a minute. Remove from oven, let stand about 5 minutes, and serve.

Though this is my first undertaking of homemade mac and cheese, I've been around and read a few recipes and this one was different in that you don't start by making a roux, you just input everything into a food processor. I thought it questionable, but proceeded confidently knowing that Lynne and Sally wouldn't do me wrong.

As it turns out, it was quite nice:


The overabundance of cheesy noodles was due to the fact that Carrie was having a Sunday brunch. Mark's here with a montage of the highlights:


Also, here's Mark explaining to Alex how his new haircut, when the bangs are combed straight down, makes him look like Lloyd Christmas from Dumb and Dumber


For reference, the real Lloyd Christmas (in case you forgot):

It's Sunday, Pumpkin

We made all this stuff on Sunday, October 5th for those of you taking notes out there.

I am absolutely besotted with Dorie Greenspan. Her blog reads like a dream. Upon seeing her post for stuffed sugar pumpkin, I knew I must make it immediately if not sooner.


I followed her recipe exactly only I added chopped parsley and chives from our garden. I would have loved to use Gruyere, my new pet cheese (I'm an amateur, I know), but I only had Grafton cheddar. It wasn't too much of a compromise.

It being Sunday, I was interested in an extended endeavor, so I thought I'd try out an idea I saw on one of my other favorite food blogs,

Last Night's Dinner. We had quite a few tomatoes that needed to be used up.


There was an incident while seasoning the polenta resulting in an overly paprika'd dish. It was okay, but the pie turned red as a result...and was a little too spicy because I'd added some chopped jalapeno (hey, we've got more of them than we know what to do with!).

The polenta pie


I had some beautiful swiss chard from the co-op, so we sauteed that up so our entire plate wasn't filled with orange. It's called "bright lights" and it lives up to its name:


Our colorful plate:


My lovely friends from Memphis, the Yarbro-Dills, sent me some excellent gifts, all arriving on my doorstep the very same day I received what may be my most favorite cookbook ever. It reads like a novel. I wish everyone I knew had a copy. I've always loved The Splendid Table gals, but I didn't know how much. I have an advanced tab system set up:
green tabs for those recipes I want to make immediately,
yellow tabs for dishes that look interesting, but can wait,
and red tabs for things I do not want to eat myself, but I'd like to make them for others (mostly egg-based dishes).

Either way, I thought it would be befitting to use the Yarbro-Dill sent apricot pistachio jam to make a super easy tart recipe from the aforementioned book.

Rustic Jam Shortbread Tart

- makes 4 to 6 servings -
Adapted from The Splendid Table’s How to Eat Supper by Lynne Rossetto Kasper and Sally Swift.

Ingredients

Zest of 1/2 lemon
1/4 cup whole almonds
3/4 cup unbleached all-purpose flour
1/4 cup sugar
Generous pinch of salt
6 tablespoons cold, unsalted butter, cut into 6 chunks
1 large egg yolk
1/2 teaspoon almond extract
3/4 cup jam (tart cherry or and wild blueberry are recommended, but I used a mix of apricot pistachio and raspberry preserves)

Procedure

1. Preheat the oven to 400°F. Butter a 9-inch round silver-colored cake or tart pan. (If using a dark-colored pan, cut baking time by 5 minutes.)

2. With food processor running, drop in the lemon zest and almonds, and grind them fine. Stop the machine, scrape down sides, and add the flour, sugar, salt, butter, egg yolk, and almond extract. Pulse until they are blended and starting to come together in small clumps at the bottom of the processor. (They should look like clusters of peas.)

3. Turn the pastry dough into the pan. With your hands, pat it to evenly cover the bottom of the pan. Give the tart a standing rim by nudging the dough 1/2 inch up the sides of the pan. Don’t worry if it looks a little ragged.

4. Bake the crust in the center of the oven for 13 to 16 minutes, or until the edges are golden and the center is starting to color. The rim will sink down a little, which is fine.

5. Remove the pan from the oven, and turn the heat up to 500°F. Carefully spread the jam over the tart, and immediately return it to the oven (don’t wait for the temperature to reach 500°F). Bake for another 5 to 10 minutes, or until the jam is bubbly.

6. Cool the tart on a rack, slice it into squares or wedges, and serve. Serve the tart warm—but not hot, because hot jam can burn.


As an added bonus, they sent this guy as well.


Thanks Yarbro-Dills!